3 KiB
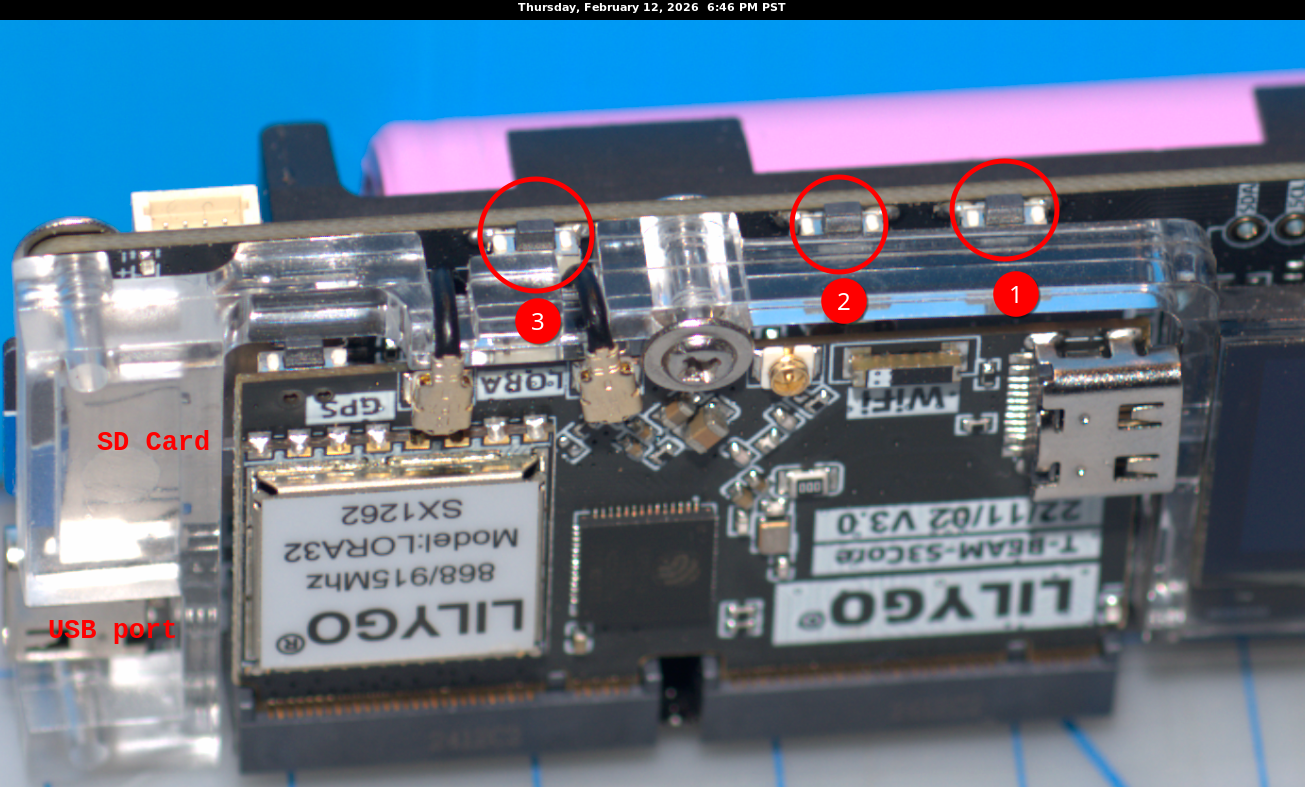
Buttons
There are three buttons

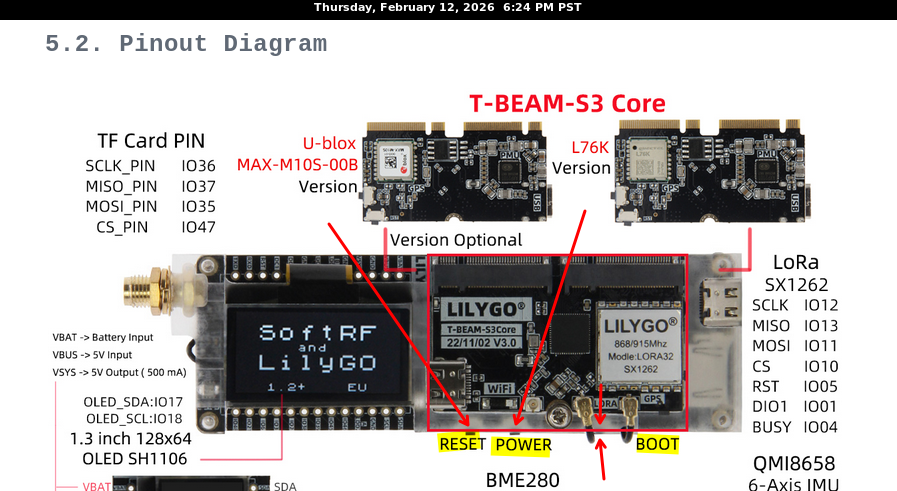
From Antenna to USB port:
- RESET
- POWER
- BOOT
RESET
The RESET button only needs to be depressed for less than 1 second. Doing so will cause the unit to reboot. If you have a "screen" monitor on the USB device, it will be disconnected. A good way to capture boot posting messages from within the unit is to have your command in a console ready to execute by depressing the RETURN key and you depress RETURN immediately after you depress the unit's RESET button, possibly allowing 1/2 second to allow kernel to recognize the new USB device, i.e. /dev/ttyACM0
POWER
If your unit is powered OFF, simply depress the POWER button will start the unit. If the unit is powered ON, then depressing the POWER button and holding it down for 6 second will cause the unit to power down. The OLED display will go dark when the unit has successfully been powered down.
BOOT
A) TODO: what happens when unit is powered ON? B) TODO: what happens when unit is powered OFF? C) To upload new binary image: depress the BOOT button and hold down, then while holding down the BOOT button disconnect the USB line and then reconnect the USB line and then lift up on the BOOT button. This will cause the unit to await an upload of an image to be stored in its FLASH memory. See further how to flash a new image in the section "Flashing Binary". Note: although the uploader may state it is trying to reset after successful installation of the new image, it seems that software attempt does not work and you have to manually depress the unit's RESET button to force a RESET. Remember, if you want to see the boot's posting, you should have your terminal ready to run "screen" so you capture the initial postings after you click RESET.
Exercises
These are progressve tests you can run to confirm how to access the unit's functionality and validate your workbench.
Exercise 00: 00_usb_radio_check
Exercise 01: ASCII ping-pong over LoRa (serial only)
Exercise 02: Add OLED display
Exercise 03: Add SD logging
Exercise 04: Replace ASCII payload with microR packets
Exercise 05: SD provisioning with identity.bin, peer list, beacon
Each exercise is self-contained:
its own platformio.ini its own src/main.cpp its own README.md with exact commands
To clean:
pio run -t clean
Nuclear option:
rm -rf .pio
Rebuild:
 pio run -e node_a

 pio run -e node_b
Upload existing firmware (will not recompile if unchanged)
Upload node A (set your port)
pio run -e node_a -t upload --upload-port /dev/ttyACM0
Upload node B
pio run -e node_b -t upload --upload-port /dev/ttyACM1
To monitor both:
screen /dev/ttyACM0 115200
screen /dev/ttyACM1 115200
Attach antennas (transmitting without antenna will cause power feedback and likely destroy your circuits) Keep boards at least ~30 cm apart so you don’t desense the receivers.
shared board pin headers in one place: shared/ boards/ tbeam-s3-core_pins.h