<p>I have added artificial intelligence (“AI”) to my home surveillance camera system.</p>
<p>No cloud service.</p>
<p>No fees.</p>
<p>No meters.</p>
<p>Everything stays on premises and is totally under my control.</p>
<p>The system I have designed is quite simple:</p>
<ul>
<li>you need a Raspberry Pi 4B (<a href="https://www.adafruit.com/product/4296">Adafruit</a> \$120 – \$190) or better,</li>
<li>a Google Coral USB accelerator (~ \$120, used to be \$60),</li>
<li>surveillance cameras that expose their rtsp feeds, and</li>
<li>[optional ]Moonfire-nvr – a Rust-based video recording system developed by Scott Lamb, a former Google engineer.</li>
</ul>
<p>I’ve been using <a href="https://github.com/scottlamb/moonfire-nvr">Moonfire-nvr</a> since 2018 and have had up to 13 cameras surveilling my two adjacent properties. Moonfire has been rock-solid. I cannot commend Moonfire enough. The reaction I get from people when I suggest Moonfire is that they want something that has AI detection. So I set out to see what I could assemble as a companion AI paradigm, keeping it simple and serviceable. I was thinking I might have to integrate into Moonfire, but I have decided to not pollute Scott’s code and live with some easy to configure and deploy scripts. Here’s what I have come up with. Yes, there are a lot of parts… that’s the beauty of owning the entire tech stack. And, everything I have added here are scripts, so you’re off to the races.</p>
<h2>Background</h2>
<p>The detection model I use with Google Coral expects an image 300 × 300 pixels in size, which is converted into the tensor the model processes. So I started from there and worked backwards because I want to minimize distortion where some software scrunches down and distorts the region in your video to fit the 300 x 300 format. You may not see how much distortion occurs. That’s the beauty of proprietary software; it hides the ugly shortcuts it might take.</p>
<p>I run most of my cameras at their highest resolution — I want to have a chance of reading a license plate, or capturing the scar on someone’s face, or getting the pattern on their socks that readily identifies them.</p>
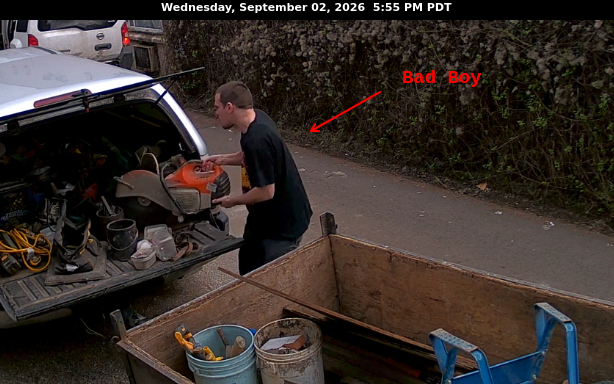
<p>Yes, one thief served 6 months for stealing my contractor’s concrete saw. See https://salemdata.us/videos/sawthief.mp4</p>
<p><img class="alignleft size-full wp-image-1216" src="https://salemdata.net/johnpress/wp-content/uploads/2026/09/20260902_175454_Wed.png" alt="" width="614" height="384" /></p>
<p>I capture a full-framed image from a video camera using ffmpeg, a set of software tools for video, audio, and other multimedia files and streams.</p>
<pre>export PASSWORD=[*FILL IN*]
ffmpeg -rtsp_transport tcp \
-i "rtsp://coral:${PASSWORD}@192.168.1.132:554/h264Preview_01_main" \
-ss 2 \
-hide_banner -loglevel error \
-frames:v 1 \
`date +'%Y%m%d_%a_%H%M%S'`_Court180_full.png
</pre>
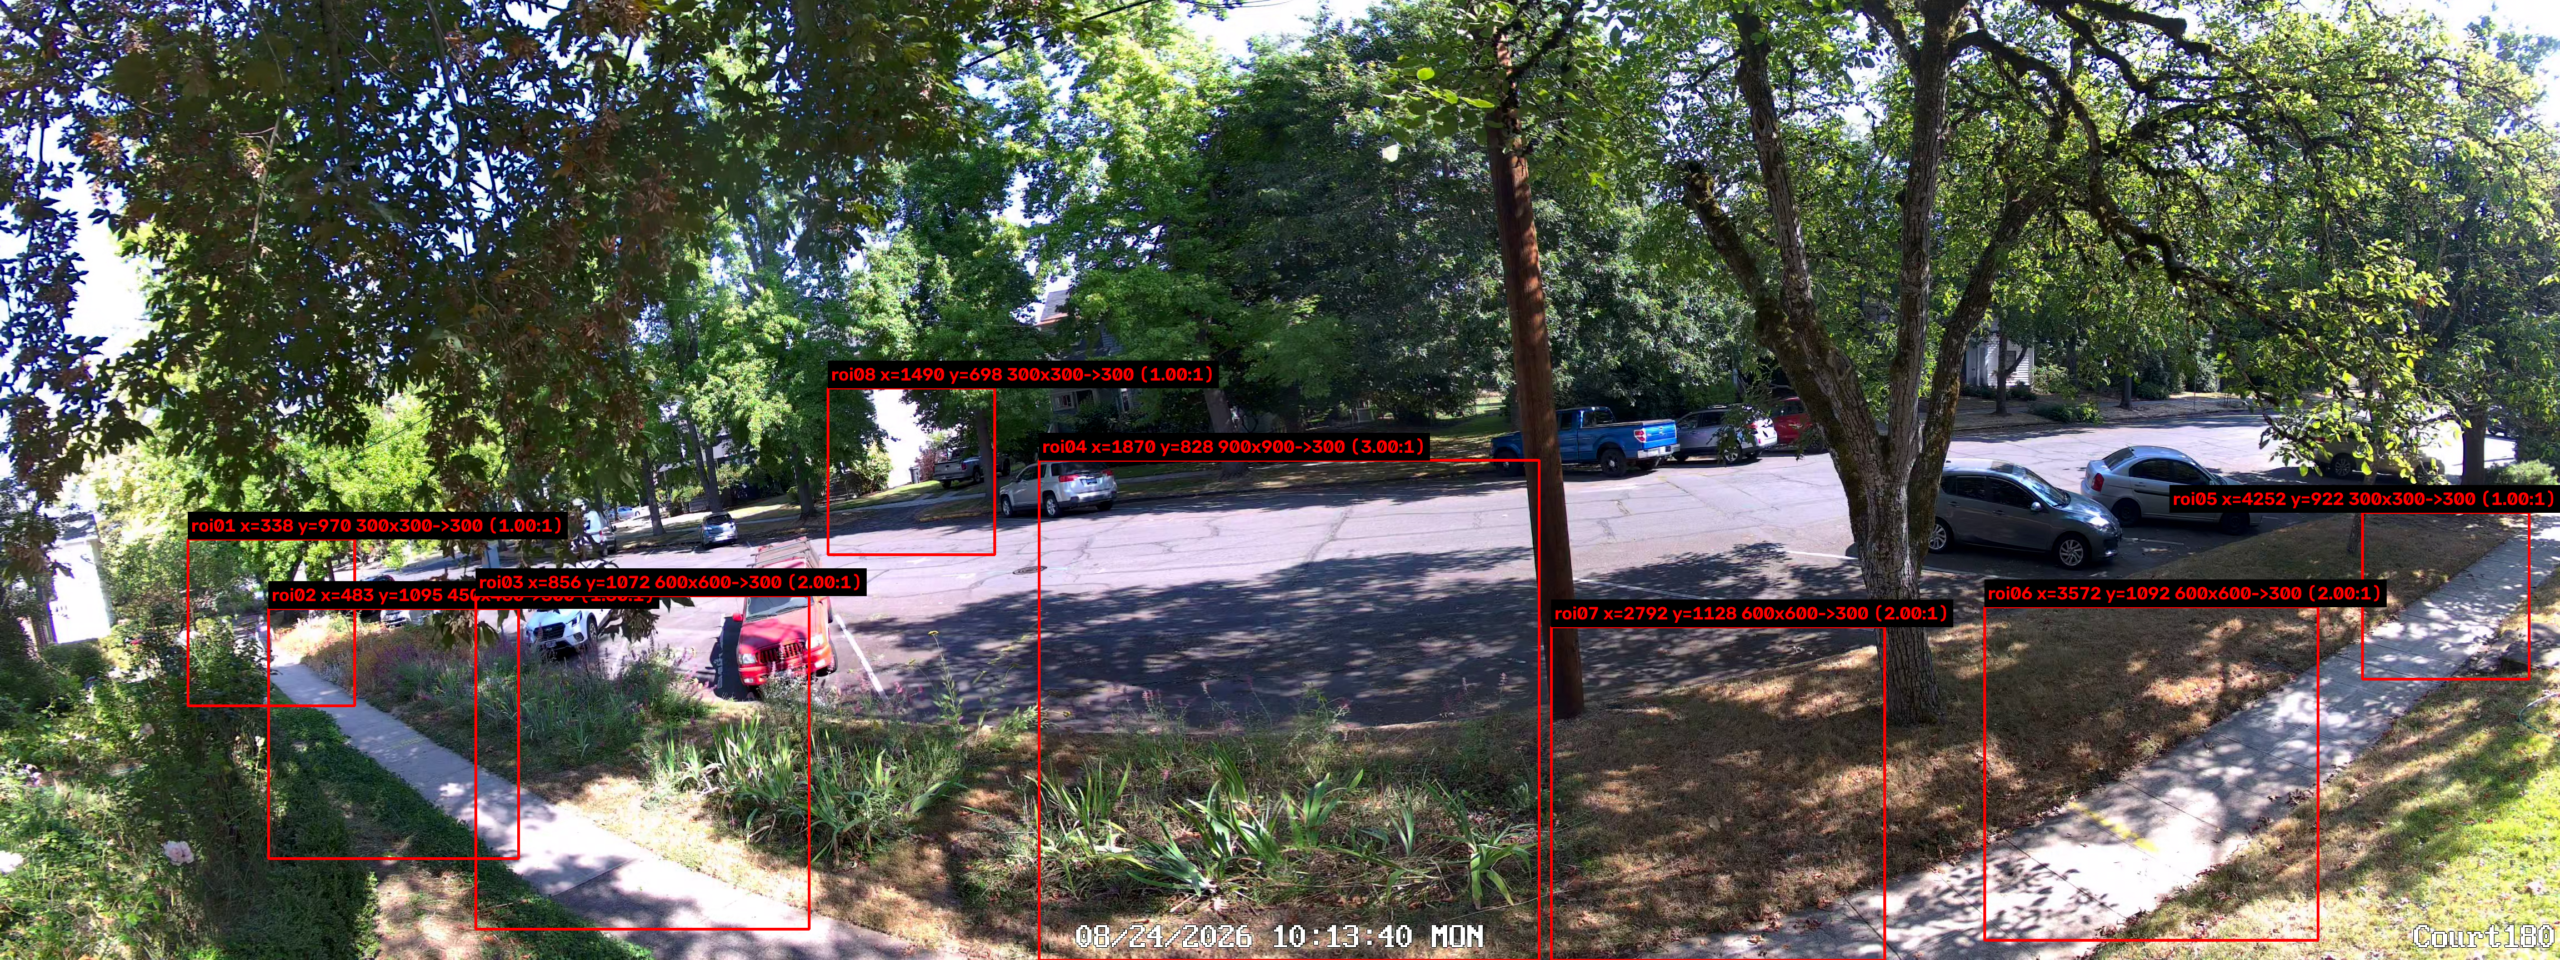
<p>This produced an image 4608×1728 which is the native resolution. I then load the image into a simple editor written in Python, <strong>roi_select_snapshot_resume.py</strong>, I created where I can place 300 x 300 pixel squares, or multiples thereof, e.g. 600 x 600 or 900 x 900 and then define regions of interest. It’s like using a cookie cutter on a rolled-out dough,</p>
<p>Here’s a video (no audio) showing a sample session creating ROIs:</p>
<p>I place these areas to define regions of interest (“ROI”). Here’s an image containing 8 regions of interest I have defined.</p>
<p><img class="alignleft size-full wp-image-1206" src="https://salemdata.net/johnpress/wp-content/uploads/2026/09/20260824_1012_Court180_full_roi_template_20260902_170156-scaled.png" alt="" width="2560" height="960" /></p>
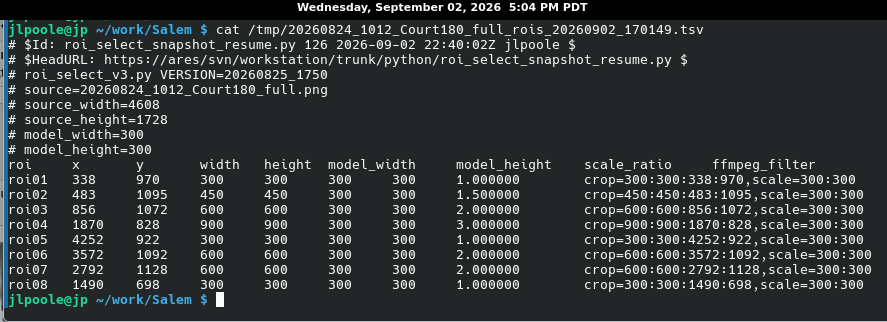
<p>The tool then exports a summary of all the ROIs I created with their coordinates. Here’s a peek of the ROI export file:</p>
<p><img class="alignleft size-full wp-image-1207" src="https://salemdata.net/johnpress/wp-content/uploads/2026/09/20260902_170447_Wed.png" alt="" width="887" height="322" /></p>
<p>The summary file will be used by the Python program, <strong>detect_image_rois_watchdog.py</strong>, which extracts the regions, downsizes them to 300 x 300 if they are large, and then feeds the image to a server where I have running a Perl script, <strong>tpu_broker_cor</strong><br />
<strong>al_json.pl</strong>, which, in turn feeds the image to the Coral Tensor Processing Unit (“TPU”). The TPU, in turn, produces a JSON result file indicating what it found and gives a “confidence” rating as to the match. A reported ‘person’ at 90% is quite likely a real person; at 5%, it might be a cat, a shadow, a garden troll, or practically anything else. The server returns a JSON report: Here’s a sample JSON file:</p>
<p><a href="http://salemdata.net/jlp/20260902_172305_014_frame006140_roi01_person_0.965.json.txt">20260902_172305_014_frame006140_roi01_person_0.965.json</a></p>
<p><strong>detect_image_rois_watchdog.py</strong> which prepared the image for submission to the TPU server then saves the 300 x 300 image in a local directory with a file name indicating the date and time and region of interest. The detection script saves the returned reports in a SQLite database.</p>
<p>So, thus far, we have a script which captures frames every second, chops up the image into ROIs, sends the square images to the Coral server and stores the image if a person was found and the return report is stored in a database. Currently, I have the current script configured to save the image and its associated JSON report only if the return report says it found a “person” with a confidence rating of 70% or more. Also I have all return JSON saved in a SQLite database, this will have to be taken off-line as the database grows too large and really having the extra data is for a study to help train a better model — but that is for another day. This runs 24/7.</p>
<p>Then I have a Perl script, <strong>motion_server.pl</strong>, which monitors the database and pushes new entries out to any web page subscribing to it. If a person with a confidence rating of 70% was found, <strong>motion_server.pl</strong> sends the image along with its report to any subscribing web page. So at the web page, I have a near real-time status page showing activity that is constantly updated as persons are detected. There are currently 8 cells with the newest at the top left and the oldest at the bottom right. Here are screenshots.</p>
<p>The Cluster Page:</p>
<img class="size-full wp-image-1221" src="https://salemdata.net/johnpress/wp-content/uploads/2026/09/20260902_160351_Wed.png" alt="" width="1119" height="784" /> Cluster Console
<p>Without the Coral inference box:</p>
<p><img class="alignleft size-full wp-image-1208" src="https://salemdata.net/johnpress/wp-content/uploads/2026/09/20260902_161122_Wed.png" alt="" width="1301" height="796" /></p>
<p>With<img class="alignleft size-full wp-image-1209" src="https://salemdata.net/johnpress/wp-content/uploads/2026/09/20260902_161107_Wed.png" alt="" width="1307" height="800" /> the Coral inference box:</p>
<p> </p>
<p> </p>
<p> </p>
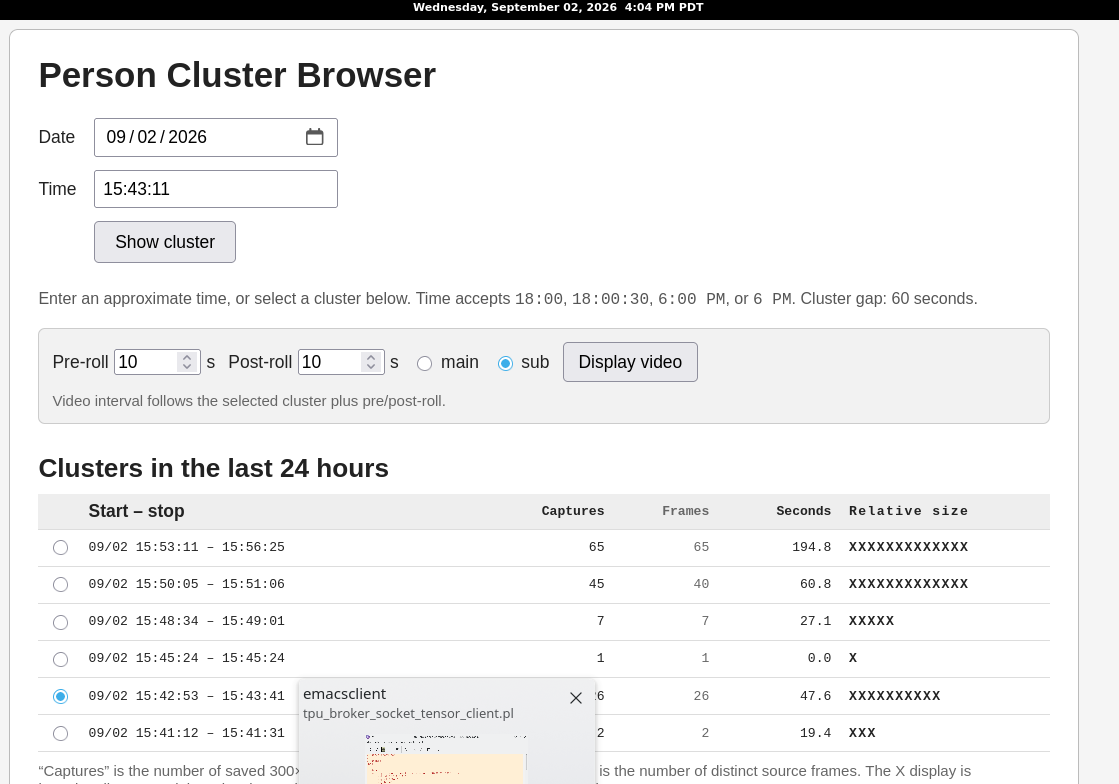
<p>Lastly, I have another script which acts as a server and if an HTML page in someone’s browser is refreshed, they will be sent a report of current activity, or clusters of activity. The user can then look at the images making up the cluster, and/or they can retrieve from Moonfire a video custom created for the cluster’s time segment.</p>
<p>Here’s a screenshot of a cluster report, top of the page:</p>
<p><img class="alignleft size-full wp-image-1210" src="https://salemdata.net/johnpress/wp-content/uploads/2026/09/20260902_160205_Wed.png" alt="" width="1313" height="776" /></p>
<p>Bottom of the page:</p>
<p><img class="alignleft size-full wp-image-1211" src="https://salemdata.net/johnpress/wp-content/uploads/2026/09/20260902_160221_Wed.png" alt="" width="1311" height="809" /></p>
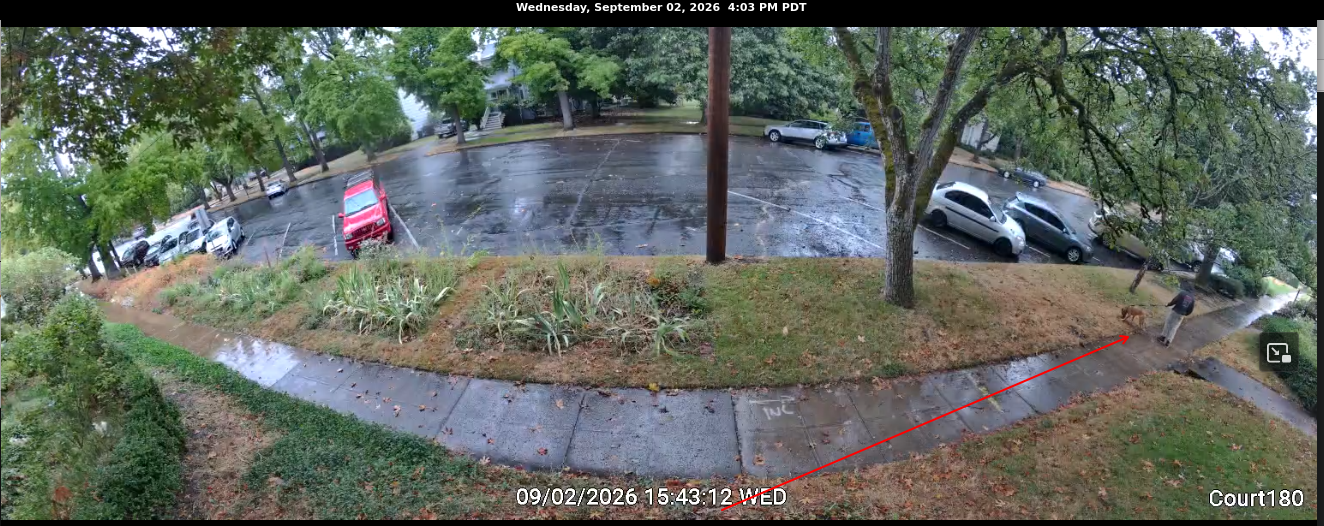
<p>Finally, there is an option to display a video relating only to the boundaries of the cluster.</p>
<p><img class="alignleft size-full wp-image-1212" src="https://salemdata.net/johnpress/wp-content/uploads/2026/09/20260902_160308_Wed.png" alt="" width="1324" height="526" /></p>
<p> </p>
<p> </p>
I have added artificial intelligence (“AI”) to my home surveillance camera system.
No cloud service.
No fees.
No meters.
Everything stays on premises and is totally under my control.
The system I have designed is quite simple:
you need a Raspberry Pi 4B (Adafruit \$120 – \$190) or better,
a Google Coral USB accelerator (~ \$120, used to be \$60),
surveillance cameras that expose their rtsp feeds, and
[optional ]Moonfire-nvr – a Rust-based video recording system developed by Scott Lamb, a former Google engineer.
I’ve been using Moonfire-nvr since 2018 and have had up to 13 cameras surveilling my two adjacent properties. Moonfire has been rock-solid. I cannot commend Moonfire enough. The reaction I get from people when I suggest Moonfire is that they want something that has AI detection. So I set out to see what I could assemble as a companion AI paradigm, keeping it simple and serviceable. I was thinking I might have to integrate into Moonfire, but I have decided to not pollute Scott’s code and live with some easy to configure and deploy scripts. Here’s what I have come up with. Yes, there are a lot of parts… that’s the beauty of owning the entire tech stack. And, everything I have added here are scripts, so you’re off to the races.
Background
The detection model I use with Google Coral expects an image 300 × 300 pixels in size, which is converted into the tensor the model processes. So I started from there and worked backwards because I want to minimize distortion where some software scrunches down and distorts the region in your video to fit the 300 x 300 format. You may not see how much distortion occurs. That’s the beauty of proprietary software; it hides the ugly shortcuts it might take.
I run most of my cameras at their highest resolution — I want to have a chance of reading a license plate, or capturing the scar on someone’s face, or getting the pattern on their socks that readily identifies them.
Yes, one thief served 6 months for stealing my contractor’s concrete saw. See https://salemdata.us/videos/sawthief.mp4
I capture a full-framed image from a video camera using ffmpeg, a set of software tools for video, audio, and other multimedia files and streams.
This produced an image 4608×1728 which is the native resolution. I then load the image into a simple editor written in Python, roi_select_snapshot_resume.py, I created where I can place 300 x 300 pixel squares, or multiples thereof, e.g. 600 x 600 or 900 x 900 and then define regions of interest. It’s like using a cookie cutter on a rolled-out dough,
Here’s a video (no audio) showing a sample session creating ROIs:
I place these areas to define regions of interest (“ROI”). Here’s an image containing 8 regions of interest I have defined.
The tool then exports a summary of all the ROIs I created with their coordinates. Here’s a peek of the ROI export file:
The summary file will be used by the Python program, detect_image_rois_watchdog.py, which extracts the regions, downsizes them to 300 x 300 if they are large, and then feeds the image to a server where I have running a Perl script, tpu_broker_cor al_json.pl, which, in turn feeds the image to the Coral Tensor Processing Unit (“TPU”). The TPU, in turn, produces a JSON result file indicating what it found and gives a “confidence” rating as to the match. A reported ‘person’ at 90% is quite likely a real person; at 5%, it might be a cat, a shadow, a garden troll, or practically anything else. The server returns a JSON report: Here’s a sample JSON file:
detect_image_rois_watchdog.py which prepared the image for submission to the TPU server then saves the 300 x 300 image in a local directory with a file name indicating the date and time and region of interest. The detection script saves the returned reports in a SQLite database.
So, thus far, we have a script which captures frames every second, chops up the image into ROIs, sends the square images to the Coral server and stores the image if a person was found and the return report is stored in a database. Currently, I have the current script configured to save the image and its associated JSON report only if the return report says it found a “person” with a confidence rating of 70% or more. Also I have all return JSON saved in a SQLite database, this will have to be taken off-line as the database grows too large and really having the extra data is for a study to help train a better model — but that is for another day. This runs 24/7.
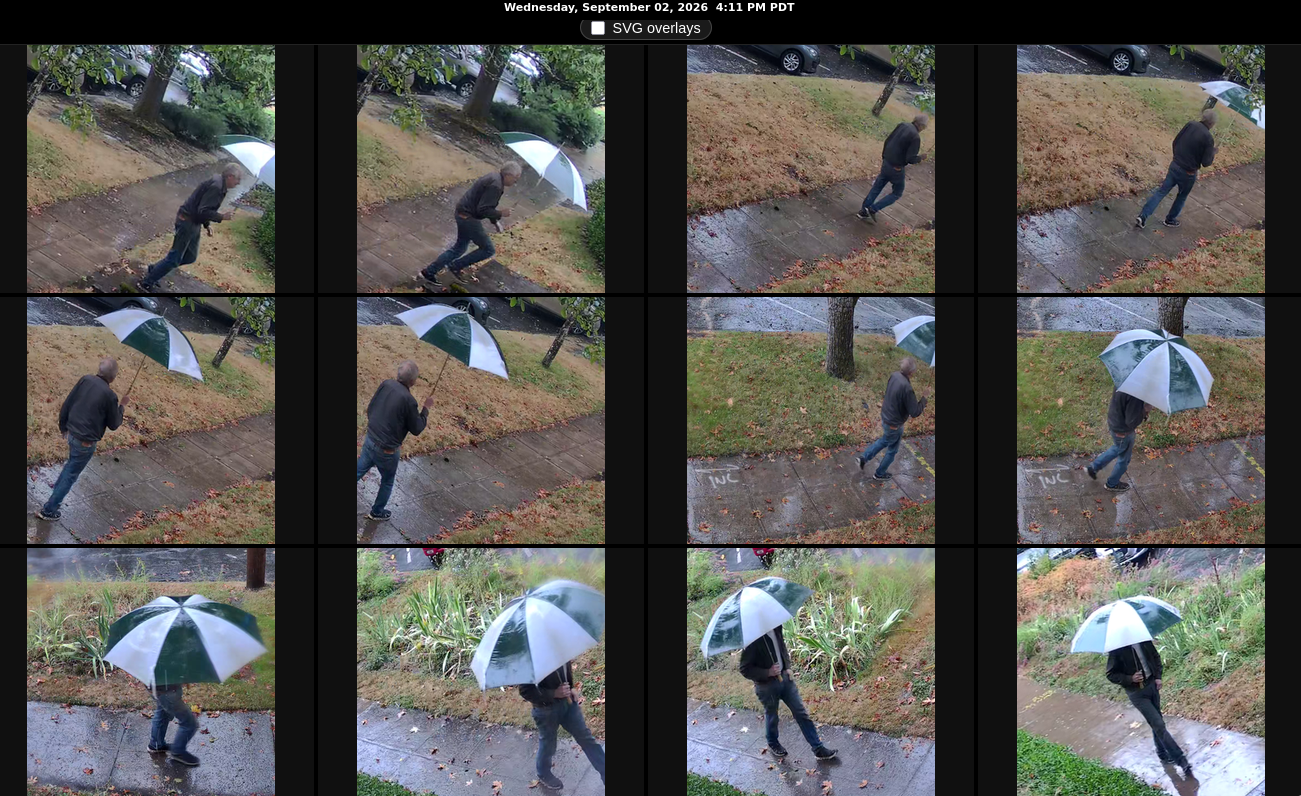
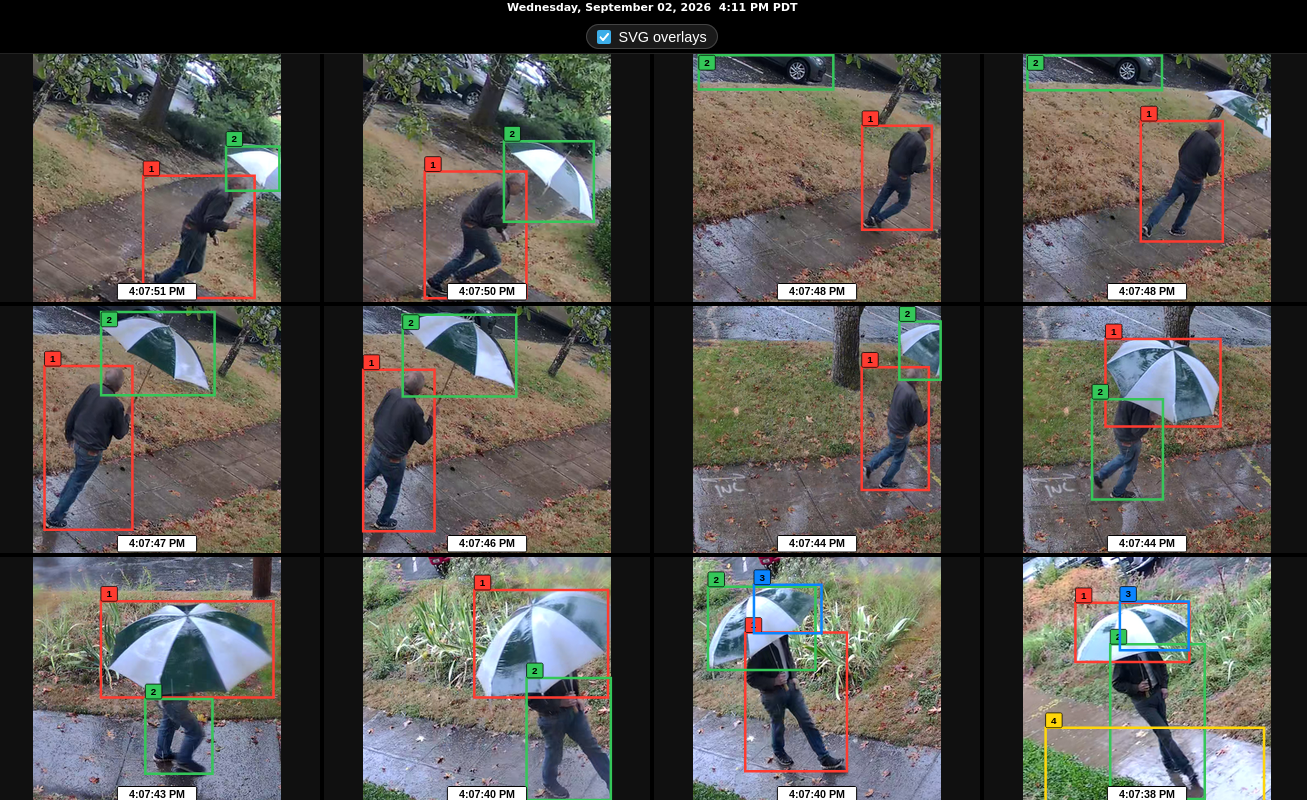
Then I have a Perl script, motion_server.pl, which monitors the database and pushes new entries out to any web page subscribing to it. If a person with a confidence rating of 70% was found, motion_server.pl sends the image along with its report to any subscribing web page. So at the web page, I have a near real-time status page showing activity that is constantly updated as persons are detected. There are currently 8 cells with the newest at the top left and the oldest at the bottom right. Here are screenshots.
The Cluster Page:
Cluster Console
Without the Coral inference box:
With the Coral inference box:
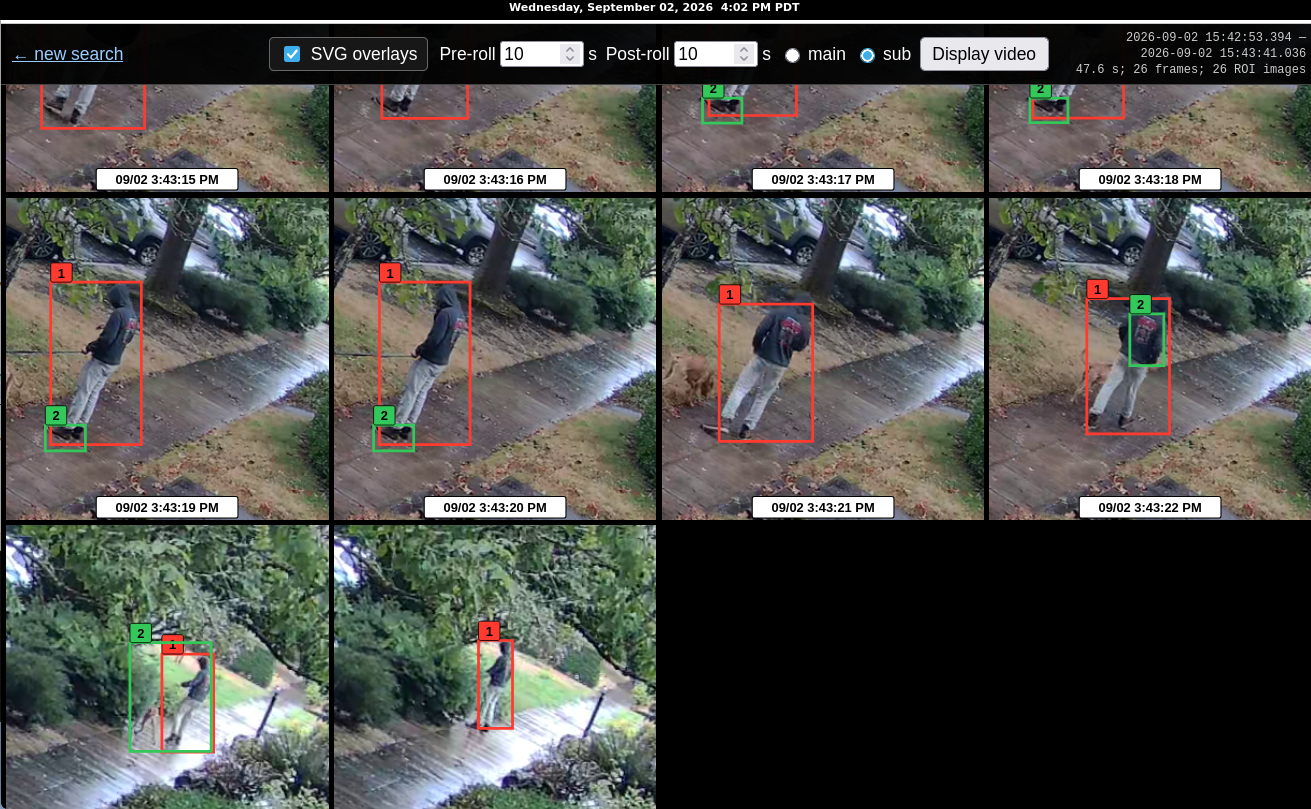
Lastly, I have another script which acts as a server and if an HTML page in someone’s browser is refreshed, they will be sent a report of current activity, or clusters of activity. The user can then look at the images making up the cluster, and/or they can retrieve from Moonfire a video custom created for the cluster’s time segment.
Here’s a screenshot of a cluster report, top of the page:
Bottom of the page:
Finally, there is an option to display a video relating only to the boundaries of the cluster.
 the Coral inference box: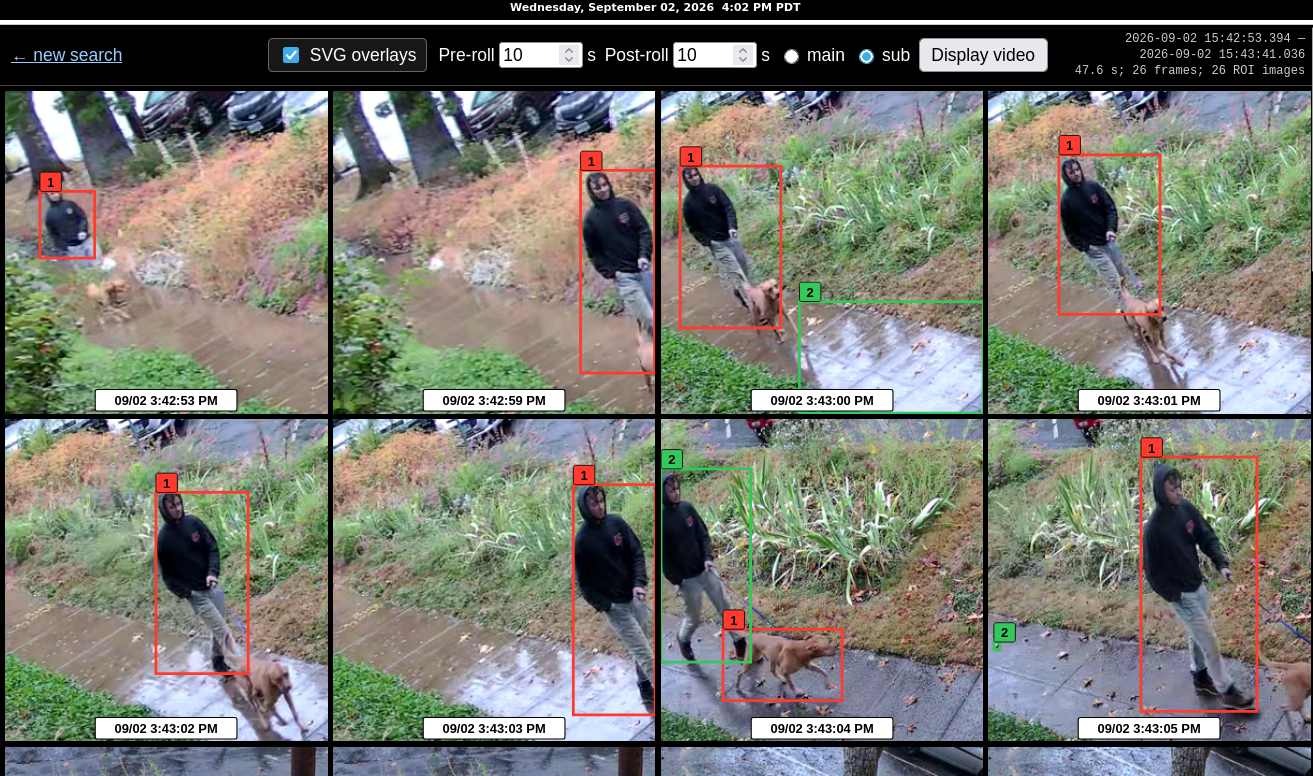
Leave a Reply